Tuesday, October 30, 2012

Tech Tuesday for October 30

Hello everyone! Happy Windy Tech Tuesday. Here are some cool tips to get your through your tech daze. (Get it? Daze?)

Share docs with non-Google users

One of the great features of Google Docs is the collaboration. You can allow anyone to access a Google Doc to view or edit. The best part is, they do not even need a Google Account to work with it. Here is how you can share a Google Doc with other non-Google. 


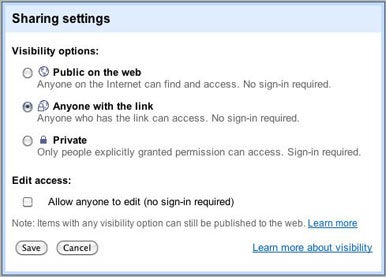
On the document page, click the lock icon and a dialogue box will appear. It will look like the picture in this post. Select either Public or Anyone in the Visibility Options. To allow editing access, check the box that says Allow anyone to edit. 
Once you have done that, click the save button and a link for you to copy will appear. Copy the link and paste it into an email to the people you want have access to the document. 
That is how you can share a Google Doc with someone without a Google Account. 
Are you interested in getting more out of Evernote? I'm doing a Webinar in November on how to use Evernote to make your life as an educator a little bit easier. It is a 3 hour workshop spread over two days (1.5 hours each day) that will cover all of the different ways Evernote can be used to benefit you in the classroom or as an administrator. If you can't make it to the presentation dates, you can always download the 3 hour session and watch it on your own time. Check out the page for more information. 
A couple of quick Smart Notebook Tips
Change the color of the background: 
Click Format, Background color. Click on color choice.  Click on more colors for more options
Remove white border around pictures: 
Right click on the picture.  Choose “set picture transparency”.  Point the ink dropper at the areas that you want to disappear and click.  Click OK.

I hope everyone has a great day. Give it a try!

-Nick

Tuesday, October 23, 2012

What Travels with Your Digital Images


When you are viewing back your digital photographs, have you ever wondered about the part of the picture that you don't see? Each time you take a photograph embedded into the file is data related to the date, time and camera settings you were using at the time the picture was taken. This data is call your EXIF. This is a technical term for Exchangeable Image File Format.

Knowing about this data has many benefits: 

1. It embeds the date and time that the photograph was taken. When you go to organize your images, you can use this as a way to break up large folders of files into smaller groupings. However the camera is only as good as the photographer. If the camera's date settings are not set correctly that is what is included in the file.

2. Captions are stored in this data. This is helpful because many programs and services allow you to provide a descriptor of the event. If you email or share the image, that information will travel with the picture.

3. Camera settings are very important, especially to professional photographers. If you had this great picture and wanted to recreate it. knowing the settings and exposure is crucial.

The only real drawback is that more and more cameras have GPS built in as a feature. If you upload, share your pictures or add them to your web page, someone might be smart enough to learn where you live by viewing the GPS information. This is one of the realities of the digital age.

- Steve Geresy 

Tech Tuesday for October 23

Hello everyone! It's been a while since my last Tech Tuesday, but I wanted to reach out and share some nice resources with all of you. If you check out the posts below this one, you will see some great posts on Livescribe, Turnitin.com, Evernote and Blogger. They are filled with tutorial videos to show you how to get the most out of each tool. Check them out and let me know if I can help. 


There is a great conference this Saturday at Oakland University. Edcamp OU is an unconference similar to the one I host in Detroit (edcamp Detroit). It's a great day of teacher led Professional Development where you can learn many great strategies to enhance classroom instruction. This is NOT a technology conference, this is an education conference that might have some technology sessions. I plan to be there and meet some of the great teachers presenting. If you are free this Saturday, checkout EdcampOU.


Google Apps for Education

For those of you interested in learning how to use the different tools available to you on your Google Account, here is a link that will take you to many different resources on how to use them. It is a great resource that will help you figure out Google Docs, Google Search, Google Maps, etc. Take a minute and see what you can add to your classroom using these tools.

Instructional Technology Team

As part of the School-Wide Initiative, our team has been looking for ways to share technology tips with our building to better support the integration of technology into classrooms. Those posts will be tagged with "South Tech Tip" so they can be easily searchable  for everyone in the building. We will also let you know who is offering the tip so you can ask follow up questions. I also want to say that everyone is always welcome to share a cool tech tip that the rest of the school should look at. This site is a great resources for those types of tips and I want everyone to be involved. Email me a tip and I will add it to the blog for the next Tech Tuesday Update.

Thanks for your time,

Nick


Monday, October 22, 2012

Using Blogger with Students

First, here is a video on what Blogging is and why you should use it.


Everyone has a Blogger.com account. Since we were all signed up to Google Apps for Education by the district, we have a Blogger account as well. If you do not know what your Google sign in is, you can search for the email that Steve W sent us earlier in the year. If you cannot find that information, send a Help Desk ticket and they will send the info to you as soon as they can. In the mean time, go to this site and use your @gpschools.org email address to create an account.

Once you have finished the process, go to Blogger.com and log in using the email address and password you just created.

Here is an intro to your Blogging Dashboard


Here is a video on how to create a blog post. 


Here is how you can mangage comments on a blog.


Choose who can edit and see your blog.


How to create and manages pages.


How to add YouTube videos to a blog post.


I hope these videos help you get started blogging with your students. Students need more reading and writing and blogging is a great way to get them writing and reading. Here is an example of some of my students' work.

Lastly, here are a couple of videos on how to use Google Reader. Google Reader is a tool that allows you to aggregate all of the student blogs your kids create. This makes is easier for the teacher to read and check in student work.


If you have any questions, please see me and I will help you out.

Tuesday, October 16, 2012

Livescribe Pen Tutorials


Livescribe Pens are becoming great tools for many teachers around the building. I have put together a playlist that will walk new users through how a Livescribe Pen works and the different ways you can use them in the classroom. Before you get to the videos, here are a couple of examples of how I have used it with my students.

Here is one example I created for In-Text Citation for my students.

Here is another example on how I used it for Plot Mountains.

Here are the Tutorial Videos


The picture below shows you how to watch all of the videos in the playlist.


To watch the other videos in the play list, you need to click this playlist icon seen below. Hold your mouse over the screen for the menu to appear at the bottom.

Turnitin.com Tutorials

I have compiled YouTube videos that demonstrate how to use the different parts of Turnitin.com. As a school, we have already looked at the discussion board element and some teachers use Turnitin.com to check kids for plagiarism, but there is more there teachers could use. By using all of Turnitin.com's features, you could avoid taking papers home ever again. Another bonus with using Turnitin.com for grading is that students can see their work as it is checked instead of having to wait for all of the papers to be checked and returned. The feedback is quicker for the students and that is very helpful to the students looking to improve their writing.

Watch the videos on how to grade papers on Turnitin and even leave voice notes for students. If you have any questions, please feel free to contact me and we can work on them during 4th hour.


To watch the other videos in the play list, you need to click this playlist icon seen below. Hold your mouse over the screen for the menu to appear at the bottom.


Monday, October 15, 2012

Evernote Tutorials

Evernote is a free tool that allows user to take notes on their digital platform and access them on any internet ready device. This device could be an iPhone, iPad, Android device, Windows phone, PC or Mac desktop or any other device that lets you have access to the internet.

Evernote is a great tool for education because it allows users to organize the notes in a way that best suits them. Once the notes are created and saved in notebooks, they can easily be shared with others through Facebook, Twitter, Email or links that can be posted to websites. Here is an example of a link I created for my students and their assignments.

I also use Evernote for all of my lesson planning needs. I can place links, photos and documents in notes to access anywhere and anytime. I can edit these notes on the go and share them with other teachers looking for ideas for their lessons. It has made life much easier using this instead of the traditional paper plan book.

Here are a series of videos for your to explore to see how Evernote works. If you are interested in learning more about Evernote in education, we can set up a time to chat 4th hour to go over the different uses.


To watch the other videos in the play list, you need to click this playlist icon seen below. Hold your mouse over the screen for the menu to appear at the bottom.